Sadly, this tutorial series is far longer than it should be because of the sheer number of things that can go wrong during this process. I spent about a few days all up getting the whole process ironed out smoothly enough for A to Z Android APK development and release.
Some people may be wondering why I don't just use Android Studio because Gradle is awesome. I do, at home and yes, Gradle is good and I love the update process but I feel Android Studio still isn't quite there yet. There's still no one-button deploy+debug (something so trivial that happens so often in Android development) and it's constantly destroying my CPU/battery life while I'm travelling. That's just not feasible.
Note: Before you start, back up your Eclipse folder. If history is anything to go by, something may go wrong even if you did everything correctly. This quick backup can save you hours of configuration if something does go pear shaped.
Contents
- Part 1 - Installing Maven for Eclipse
- Part 2 - Compiling and building your APK
- Part 3 - Converting an existing Android project to a Maven project
- Part 4 - Share a library project using a local Maven repository
- Part 5 - How to debug your Android app with Maven?
- Part 6 - Sign your Android app APK for release
- Part 7 - Global properties and settings for Maven
Downloads
- Eclipse v3.8.2 (I've found these instructions don't work for Eclipse below 3.8, unsure about v4.x+)
- Java 7 JDK (not JRE. Java 6 is ok, but not Java 8)
- Download Maven 3.2.3 (Binary zip).
- While that's downloading, using the Eclipse software installer: Download Maven for Eclipse (m2e-apt) via http://download.eclipse.org/technology/m2e/releases
- Untick "Show only the latest versions of available software"
- Install "m2e - Maven Integration for Eclipse v1.4.1.20140328-1905".
Don't use the latest version 1.5.0, it'll cause this error:
Cannot complete the install because one or more required items could not be found.
Software being installed: m2e - Maven Integration for Eclipse (includes Incubating components) 1.5.0.20140606-0033 (org.eclipse.m2e.feature.feature.group 1.5.0.20140606-0033)
Missing requirement: Maven Integration for Eclipse 1.5.0.20140606-0033 (org.eclipse.m2e.core 1.5.0.20140606-0033) requires 'bundle com.google.guava [14.0.1,16.0.0)' but it could not be found
Cannot satisfy dependency:
From: Maven Integration for Eclipse (Editors) 1.5.0.20140606-0033 (org.eclipse.m2e.editor 1.5.0.20140606-0033)
To: bundle org.eclipse.m2e.core [1.5.0,1.6.0)
Cannot satisfy dependency:
From: m2e - Maven Integration for Eclipse (includes Incubating components) 1.5.0.20140606-0033 (org.eclipse.m2e.feature.feature.group 1.5.0.20140606-0033)
To: org.eclipse.m2e.editor [1.5.0.20140606-0033]
- Restart Eclipse when done.
- Again using the Eclipse software installer: Download Android for Maven (Android Connector) from http://rgladwell.github.io/m2e-android/updates/. This lets you create Android projects using Maven.
- Restart Eclipse when done.
Setting up Eclipse for Maven
The plugin com.jayway.maven.plugins.android.generation2:android-maven-plugin:3.8.2 requires Maven version 3.1.1
The android-maven-eclipse plugin has an implementation of Maven built into it. That implementation is for an older API and no longer compatible with the builds that we need (AAR support is needed for Android's appcompat-v7 and shared libraries).
- Extract "apache-maven-3.2.3.zip" to "C:\Development\Java\apache-maven-3.2.3\" (You can put this anywhere, but adjust the instructions to match your folder)
- In Eclipse, go to Preferences > Maven > Installations > Add > C:\Development\Java\apache-maven-3.2.3\
- OK to save
Make sure you're using the right runtime environment.
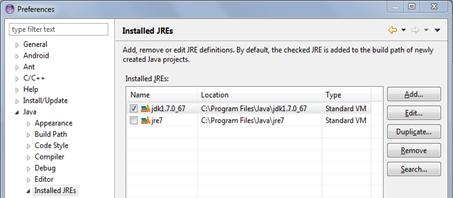
- Open up Preferences > Java > Installed JREs
- If "JRE" is ticked then you've got the wrong runtime environment installed. What you need for development is a JDK, and Java 7 (or 6) is the version you need (Android doesn't support Java 8 yet).
- Click on Search and find your Java installation folder, normally C:\Program Files\Java
- Search should now fill in some JREs for you.
- If no JDK's appear, you'll have to download a Java7 JDK and repeat the search after it's installed.
- Select the JDK and click OK to save.

If you didn't set this up correctly, it will cause the following error:
No compiler is provided in this environment. Perhaps you are running on a JRE rather than a JDK?
This might sound silly, but open up Preferences again. This step needed the JDK to be set up properly in order to work.
Now we're going to select which environment is executed. This prevents the stupidly undescriptive "The method of type new must override a superclass method" error when trying to compile your code.
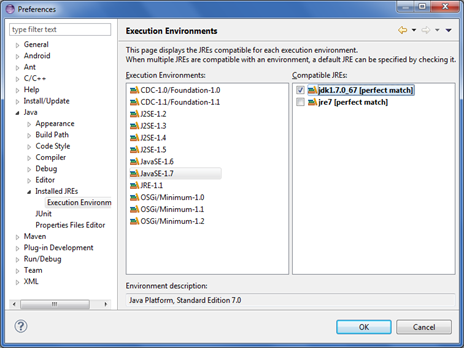
- Go to Preferences > Java > Installed JREs > Execution Environments.
- Make sure that you have "JavaSE-1.7" (or JavaSE-1.6 if you're using Java 6) and that the "Compatible JREs" column shows the JDK option.
- Tick it, then OK to save.

System environment variables
One final step for the future is to set some system environment variables.
- Start menu > type in "system environment variables"
- Click on "Edit the system environment variables"
- Click on "Environment variables"
- Click new on either user or system variable
- Firstly, set "M2_HOME" to "C:\Development\Java\apache-maven-3.2.3" (no trailing slash)
- Now edit "Path" and add "%M2_HOME%\bin" at the end.
This will let you run "mvn" from any command prompt, which is needed for building, deploying and debugging later on.
Now you're finally to start converting your Android project to Maven.
Sources
- Configuration · excilys/androidannotations Wiki · GitHub
- Maven · excilys/androidannotations Wiki · GitHub
- Building Project Maven Eclipse · excilys/androidannotations Wiki · GitHub
- m2eclipse - Downloads
- Maven for Eclipse 1.5.0 plugin cannot be installed under Kepler - Stack Overflow
- EclipseIntegration - maven-android-plugin - How to use Eclipse with Maven and Android. - (renamed to android-maven-plugin) Easy to use Maven plugin for Android™!
- GettingStarted - maven-android-plugin - Get started using Android Maven Plugin - (renamed to android-maven-plugin) Easy to use Maven plugin for Android™!
- m2e-android - Android for Maven Eclipse
- Android for Maven Eclipse | Eclipse Plugins, Bundles and Products - Eclipse Marketplace
- akquinet/android-archetypes
- maven archetype for an android project - Stack Overflow
- java - Maven complains about @Override annotation first time but compiles successfully next time - Stack Overflow
- java - 'Must Override a Superclass Method' Errors after importing a project into Eclipse - Stack Overflow
- Re: Annotation @Override error - 'must override a superclass method' in eclipse
- How to Fix Must Override a Superclass Method Error Eclipse IDE Java | @Override annotation With interface methods
- What causes a new Maven project in Eclipse to use Java 1.5 instead of Java 1.6 by default and how can I ensure it doesn't? - Stack Overflow
- Maven Compiler plugin - Setting the -source and -target of the Java Compiler

